
I am always looking for fun activities for students that involve STEAM principles and encourage students to come into the library. Last school year, I attended the Texas Librarian Association Conference, an annual event for all librarians. There a colleague showed me how to make do-it-yourself LED Name Tags. The entire process took about 10 minutes to demonstrate, so if you are looking for a quick STEM activity, then look no further.
I have made DIY LED Name Tags two different ways. The first way was with solid plastic name tags that were generously purchased by my PTO from a district vendor. However, being a librarian with a limited budget, I came up with a cost-effective alternative using a clear name tag holder. I love doing this as a STEAM night for the students or opening it up for the community to attend as well!
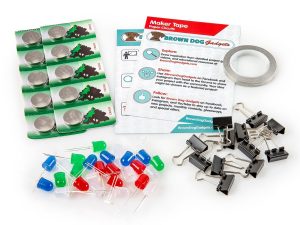
Materials
- LED Lights
- 3V Battery
- Tape
- String or a key ring
- Clothespin
- Material that you can write on or scratch like milk jugs, clear plastic plates, clear name tag holders, old cassette tapes, or solid pieces of plastic
You can also use this paper circuits kit that includes LEDs and batteries. Plus, it has conductive tape which helps too!
How to Create a DIY LED Name Tag:
- When I am introducing any DIY project, I show a premade example, so students understand what they are going to make. It’s a good idea to create one on your own beforehand.
- Have the students cut the milk jugs, clear plastic plates, or other material you selected for your name tags. You can also cut the pieces beforehand for the students.
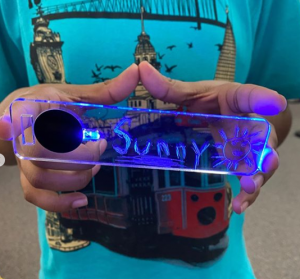
 Students can either write their name in permanent marker or they can etch their name onto the plastic using a clothespin. I recommend the permanent marker route for students third grade or lower, but older students should be able to etch their names. I have had fourth graders etch their name and it went well!
- Attach the 3V battery to the edge of the nametag and connect the LED to the battery. Have one end of the light touch one side of the battery (positive) and the other end of the light touch on the other side of the battery (negative). If the light does not turn on, you likely have your positive and negative terminals reversed—the longer leg of the LED is positive, and the shorter leg is negative.
- Tape the sides down once I have them working to hold everything in place. To turn off the LED, simply free one leg of the LED.
- Discuss how the connection of the LED to the battery completes a circuit. Freeing one leg breaks the circuit, and the LED will not light.
- Take lots of pictures! I think it is a fun and creative way for students to express themselves through STEAM!
See more from Jessica:


Leave A Comment